Saturday, December 6, 2014

The Follow Me Tool

Video Tutorial 5 -  
The FOLLOW ME TOOL 


1. Video Tutorial 1 - Downloading Free Sketchup
2. Video Tutorial 2 - Getting Started - Choosing a Template 
3. Video Tutorila 3 - The Drawing Tools - LINE TOOLS 
4. Video Tutorial 4 - The Drawing Tools -  SQUARE TOOL, CIRCLES AND ARCS
5. Video Tutorial 5 - The 3D Creation Tool - THE FOLLOW ME TOOL (this tutorial) 
6. Video Tutorials 6  - The Editing Tools - COPY, MOVE AND SCALE TOOL 
7. Video Tutorials 7  - The Editing Tool - OFFSET TOOL 


I came across the use of follow me tool in Sketchup. There are 3 easy methods to use this tool. This is what I have discovered using this tool.


Using the "Follow Me" tool
Here's the procedure on how to use the Follow Me Tool

Method 1 - following a specific path 


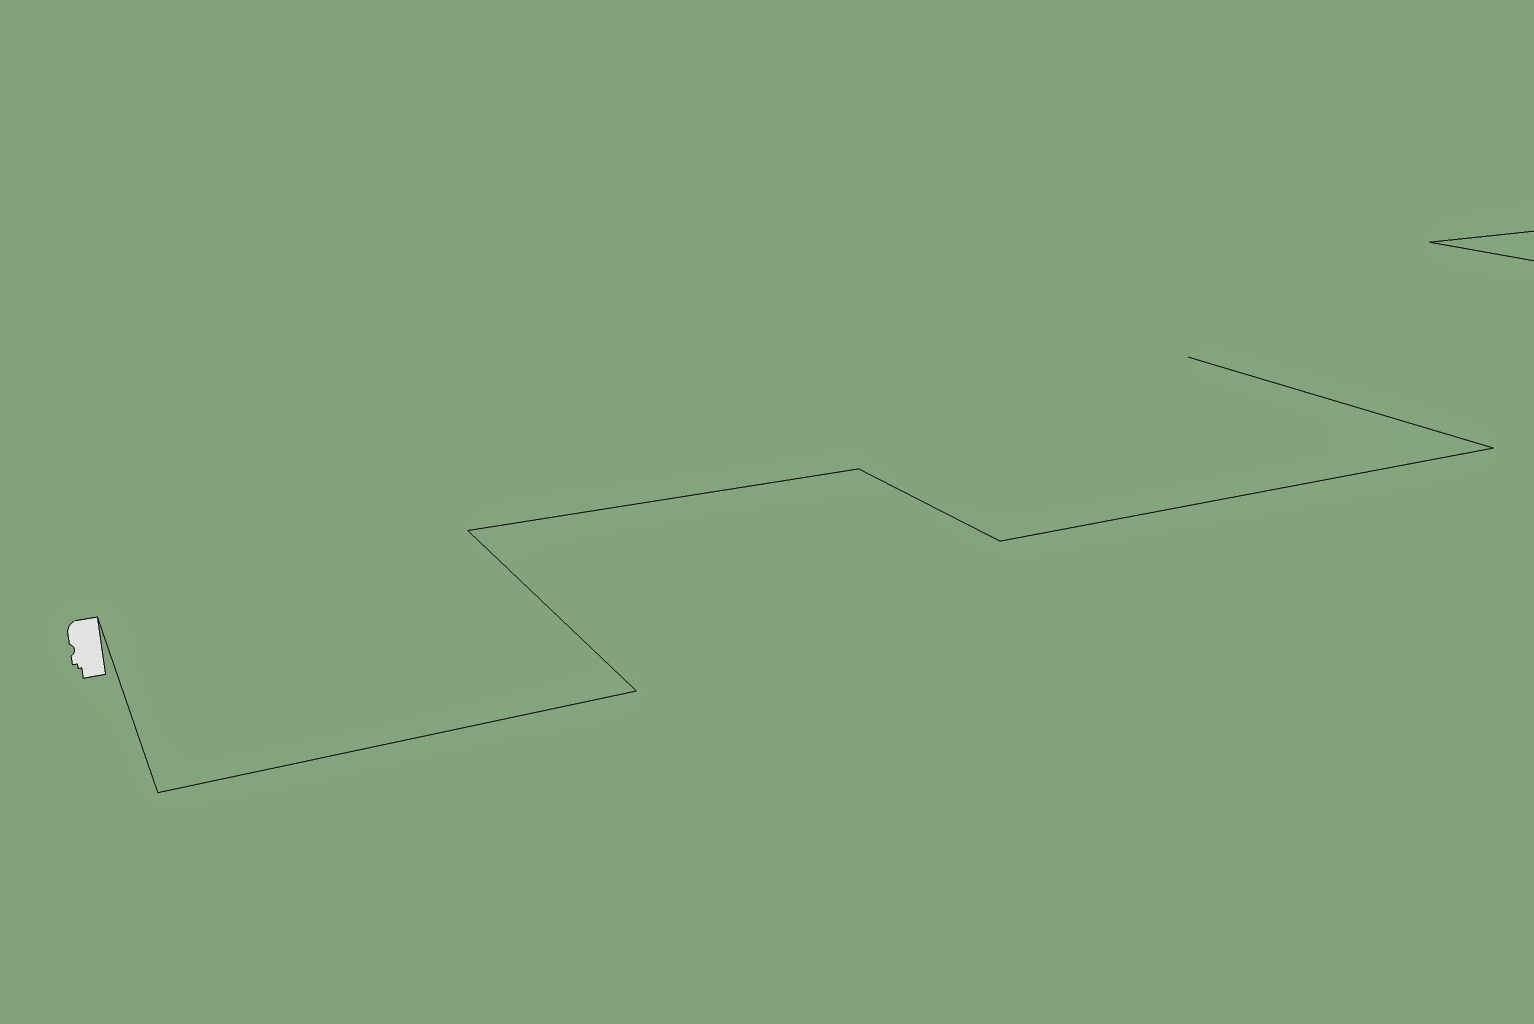
Draw a section of the object you want to model in 3D and the path where you want your 3d object to follow as shown on this sample figure:
section 1
path to follow

Select the section and pick "follow me tool" then drag the section towards the path, a red line will appear on the path and the section you have created is turning into a 3d model following the path.


drag the section towards the red line following the path
the final 3d model using "follow me tool"

Method 2 - Following a path by picking the path " follow me tool" 

This is another easy method using this tool. Having your section ready, pick the path first

If the path is complicated and hard to drag when using the first method, this method will be very helpful.


Method 3 -  by picking a surface

If you have a surface regardles of its shape, you can still use the follow me tool by picking the surface first and then the section. The section you are creating will follow the perimeter of the surface.

The Section

The Surface

The Final 3D model

Hope this will help you use the follow tool mor effectively and efficiently.


Tuesday, November 18, 2014

Getting started with the Line tool in Sketchup

Video tutorial 3 - The Drawing Tools - LINE TOOLS
3dartrender

If you are new to Sketchup, you can follow and watch Video Tutorials outlined below:  These tutorials are arranged for you to be able to access all the series from Video Tutorial 1 (for beginners)

1. Video Tutorial 1 - Downloading Free Sketchup
2. Video Tutorial 2 - Getting Started - Choosing a Template 
3. Video Tutorila 3 - The Drawing Tools - LINE TOOLS (this tutorial) 
4. Video Tutorial 4 - The Drawing Tools -  SQUARE, CIRCLES AND ARC TOOLS
5. Video Tutorial 5 - The 3D Creation Tool- FOLLOW ME TOOL
6. Video Tutorials 6  - The Editing Tools - COPY, MOVE AND SCALE TOOL 
7. Video Tutorials 7  - The Editing Tool - OFFSET TOOL 


The LINE tool is your starting point in any drawing composition. As a designer, Sketchup has developed this tool which is similar to your pencil or pen tool in manual sketchin. Using the line tool (pencil tool, represented by the icon) is easy. Take note on the 3 guidelines that appear in the drawing interface. The Vertical line (represented by green line), the horizontal line (represented by the red line) and the upward line (represented by the green line). 

In the beginning, you will be drawing the lines that corresponds to the default coordinate system that corresponds to the vertical and horizontal lines. Notice that the line that you draw is represented by a black line, whenever you drag the pencil tool, the black line will turn to either green, red or blue, that means the next line you will be creating is parallel to the corresponding color. Pick the first point then drag towards the direction you want your line to appear, either vertical (green) or horizontal. You can enter a certain value using your keyboard and the value can be found at the lower right corner of the screen. 


Getting started with Sketchup using Square, Circles & Arc tool


Video Tutorial 4 -  
Drawing Tools - SQUARE, CIRCLES & ARC with the introduction to PUSH/PULL


If you are new to Sketchup, you can follow and watch Video Tutorials outlined below:  These tutorials are arranged for you to be able to access all the series from Video Tutorial 1 (for beginners)

1. Video Tutorial 1 - Downloading Free Sketchup
2. Video Tutorial 2 - Getting Started - Choosing a Template 
3. Video Tutorila 3 - The Drawing Tools - LINE TOOLS 
4. Video Tutorial 4 - The Drawing Tools - SQUARE TOOL, CIRCLE & ARC with Introduction
to PUSH/PULL TOOL (this tutorial)
5. Video Tutorial 5 - The 3D Creation Tool - THE FOLLOW ME TOOL 
6. Video Tutorials 6  - The Editing Tools - COPY, MOVE AND SCALE TOOL 
7. Video Tutorials 7  - The Editing Tool - OFFSET TOOL 


Drawing Tools are your most commonly used tools in creating any design composition. These tools are simple and straight forward. This is to help you create two-dimensional to 3d object. 

The starting point is to create a line, or arc or even squares and circles that is an objects with a surface that can be extruded using PUSH/PULL tool. This is the only tool you can use to create three dimensional objects. LINE and ARC tools are used to create irregular shapes as in the creation of a plan layout in different shapes, connecting the first point with your last created point, the object you drew will become a closed polygon (with a surface) that can be extruded too. This is a great way to help you understand the basic principle in creating a 3d object.  Watch the video tutorial and take some time to explore these tools. Once you have learned and got familiar with the tool, you are more likely to enjoy using sketchup.

Friday, November 7, 2014

Before Using Sketchup choose a Template

It would be wise to start using a sketchup by choosing the right template for a particular project you are working. The templates relate to the unit set-up of a drawing. If you are working on a large scale project or a small 3d printing layout, it has a corresponding template. This is how user-friendly and easy to use the sketchup is. This will save you a lot of time and effort.

You can follow through this lesson and watch the video to get your started from choosing the template here.


What Template is suitable for you?

There are a lot of templates you can choose from, you can have the choice of having to set up your drawing to english system or metric system. It can also be either in feet or in inches, meters or millimeters.

From the selection, you can determine what kind of drawing you will produce. It will be on a macro or micro settings. If you are working on a large scale, then millimeter or inches will be irrelevant, or vise versa. Your drawing composition will be affected by the settings you choose. It is better to choose the right template for the right kind of drawing. 

The best way to answer the question is to determine what kind of drawing will you produce?
e.g. Doing a masterplan of a community or preparing a drawing for the construction of a cabinet. You will see the difference and notice a slowing down of your computer's performance if the setting is wrong.


For Sketchup Pro 2014, this is the sample of the template availabe in sketchup 


If you are using google sketchup pro, this is what it looks like;


Which one is best for you - you choose

Wednesday, October 22, 2014

Starting with Sketchup

 After Downloading, you can install the free version and follow the installation instruction. If this is the first time you will use sketchup, this will guide your through the process and follow along with the tutorials provided. Let us walk through the interface of Sketchup and explore all the tools you are going to use.


A look inside Sketchup

When you first launch the Sketchup, It will prompt you to choose a template or start using sketchup. see figure below;


The Template will let you set-up the units which are as follows:

1. Simple Template                       - Feet and Inches
2. Simple Template                       - Meters
3. Architectural Design                  - Feet and Inches
4. Architectural Design                  - Millimeters
5. Construction Documentation     - Feet and Inches
6. Construction Documentation     - Millimeters

7. Construction Documentation     - Meters
8. Architectural Design                  - Meters
9. Urban Planning                          - Feet
10. Urban Planning                        - Meters
11. Landscape Architecture           - Feet and Inches
12. Landscape Architecture           - Meters

13. Woodworking                           - Inches

14. Woodworking                           - Millimeters

15. Interior & Production Design    - Inches

16. Interior & Production Design    - Millimeters

17. 3D Printing                               - Inches
18. 3D Printing                               - Millimeters


Choose the units you are comfortable using and for which purpose you will produce your drawing and after that, you can start usign sketchup. In this case, Architectural Design - Meters is selected and click "Start Using Sketchup".

And there you go, you are now ready to start using sketchup


This is how your screen will look like and we will go through all the tools in the next lesson.


Go back to the lesson here:


Watch the Video Tutorial here (Choosing a template)